Blogger templates

Pages

Saturday 19 September 2015

Adding gmail contacts to whtsapp for PC

WhatsApp is really a great messaging app for Smartphones and now the company has made it available for PC and MAC too. The company is working on it to make more user friendly and adding some new functions too like voice chat and more. Everyone knows about it functions like adding contacts and more who use it on mobile phones, but PC users are facing a trouble that how to add gmail contacts to whatsApp for PC. It’s a really great experience using WhatsApp on a computer or mac through Bluestacks.com, but we face problems while importing our precious contacts from gmail id .
So here are few easy steps to import contacts from gmail.

1. Log in your gmail account and click on contacts on the left upper side.
Adding gmail contact
2. Now your all saved contacts will be visible there, click on more option and click on export but before exporting don’t forget to check the mobile numbers and add + followed by the country code if your friend is international.
If not then fill the mobile numbers in contacts along with the country code otherwise contacts won’t work without a number and importing contacts on WhatsApp will be useless.
Export Gmail Contacts

Read : How to use WhatsApp on PC and Laptop using Bluestacks?

3. After that, following box will be opened and select all contacts and vcard format options.
Export Contacts via Vcard
4. Now click on export button and save the card (visiting card) file.
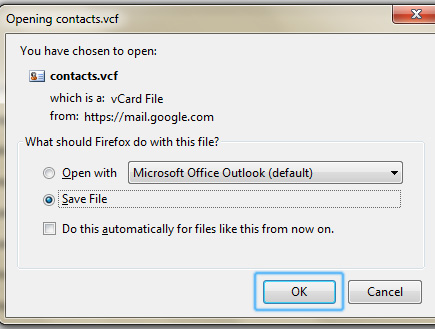
Visting card Saving Image
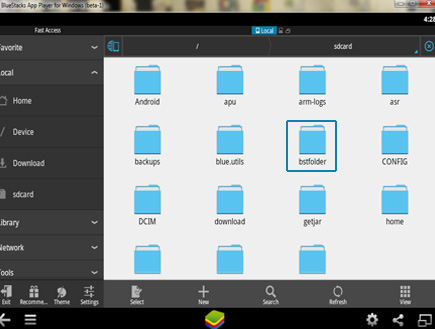
5. Start your Bluestacks and go to app search and find Ex-explorer of Files program and install it .After installation check Ex-explorer of Files program in my apps on the home screen of Blue Stacks.
File Explorer Image
File Explorer Image
6. First copy your contacts.vcf file from downloads that you exported from gmail and paste it in C:\ProgramData\BlueStacks\UserData\SharedFolder after that you need to select a contact file through BlueStacks so Click on file-explorer – sd card –bst folder—bst shared folder-contacts.vcf. When you click on contacts, the programme will start to read the file.
Contact .vc file image
Import Gmail Contacts
7. Now go to WhatsApp and click on show menu from the bottom left side and click on contacts. Now again go to the left bottom side and click on show menu then import/export contacts. At the last, click on import from SD card.
Import Contacts From SD Card
8. Finally your contacts will start copying and you will have your gmail contacts in Whats App. it takes some moments to complete the procedure.
Import Gmail Contact
If you have any problem while transferring your gmail contact to Whatsapp, drop a comment below, we will try to resolve your issue as soon as possible. If you love above information or tutorial, then please share this tutorial with your friends on social media. You can send mail also to us directly through our contact us form.

Wednesday 6 May 2015

20% cashback on DTH recharge

Get 20% cashback on DTH recharge
DOWNLOAD THE APP
How to avail 20% cashback on DTH recharge?
  1. Download the FreeCharge Mobile App
  2. Complete your DTH Recharge using Debit/Credit card - No promocode required
  3. Enjoy 20% Cashback!
DTH offer Terms & Conditions
  1. Get 20% ​C​ashback  on ​DTH Recharge done only through  FreeCharge Mobile App (Android/iOS/Windows)
  2. Maximum Cashback of Rs.200 available per DTH Connection
  3. Offer ends on 15th May 2015 23:59:59
  4. Valid for a maximum of 5 redemptions per user/debit/credit card
  5. Valid only for debit/credit card transactions
  6. Not valid on Add Cash Transactions & FreeCharge Credits
  7. Cashback will be credited as FreeCharge Credits within 24 hours of recharging
  8. For any queries, email us at  care@freecharge.com

Wednesday 29 April 2015

RS 100 cashback on DTH recharge

Hello Friends Paytm come with new Recharge offer .In this Offer You can Get Rs 100 Cash Back on recharge Of Rs 400.It means .


So For getting This deal Please Follow The Procedure.  - 

Install Paytm App Or Login Paytm.com 

Register or Login to your Account.  

Start a DTH Recharge of Rs.400 or More.  

Apply Promo code:- DTH100 Make Payment.  

You will get Rs.100 cashback in your Paytm. account.  

Offer can be used once per account. 

#PaytmKaro Keep Visiting & Enjoy Free Recharging

Monday 27 April 2015

Donate To Nepal Earthquake Victims


Hey readers.. We all know about the Nepal tragedy.  People over there really need our help. It will just take your few minutes. Paytm has come up with a great  innovation. You can donate money via paytm for needy people in Nepal. To donate visit the paytm page Or open paytm app in your mobile and search for "Donate Nepal". You will find different coupons worth Rs.10, 20, 50, 100, 500, 1000 and 10000. Add them to cart and complete the payment. Paytm will pay rupee to rupee means paytm will add equal amount to your donation i.e if u donate Rs.10 paytm will add 10 more and so on. Play your part. Lets show that no religion,caste,creed,religion or country is greater than the act of humanity.

Thursday 23 April 2015

Install Snapdeal App and Get Rs.50 Freecharge Credits

Snapdeal Again Deal With FreeCharge And Giving Rs.50 FreeCharge Credits. No Minimum Purchase Required Now. Just Follow Below Given Steps And Avail Freecharge Credits.


Procedure:-   

 • Install Freecharge App  
 • Login or Register.       
 • Start a Recharge of Rs.10 or more.        
 • Complete the Recharge.        
 • On the final confirmation page, you will see Snapdeal –FreeCharge offer [See Screenshot]         • Click on "Install the snapdeal & get Rs 50".        
 • Follow the instructions to download the app.        
 • That's it. Now don't uninstall the app until you will have received money in your account. 


Wednesday 22 April 2015

Droid4X– Free Android simulator for PC Windows & Mac OS X

There was a dearth of good android emulators when it came to Mac OS , and Windows too had limited options when it came to free good android emulators & simulators. Fortunately, the scene is changing with some new entries and one of them is – Droid4X!. Droid4X is the sort of Android simulator designed for Power! , it provides complete power to the users by virtue of its speed! and things such as Complete Root Access. Also Droid 4X is an ideal android emulator for Windows Tablet esp(Lix Tablet PCs) Let’s have a peek onto some features.


Features:
- A smooth Android experience
Droid4X is designed based on the Android 4.2.2 OS, hence the reason why it is compatible with most apps on Google Play Store. It also comes with the default browser which enables one to browse as many webpages as desired and interact freely thanks to the embedded Flash player.
- More Available Memory
Droid4X comes with 16GB of internal memory and 32GB of external SD card memory (all emulated). Thus, one will be able to install all favorite apps and games and experiment with different kind of files without having to worry about memory. Given that biggest games on Google Play Store take around 2.5GB of memory that should be enough for installing at least 10 of those games.
- Perfect for Developers and Users Alike
Developers can test out their newest apps with the aid of this program, and see how well they perform on a top-notch device. Additionally, users can reap the benefits of newest games, being able to play them on own computers without the need for any extra hardware.
- No Lag
If some devices struggle with running the Android 4.2 OS due to processor and memory limitations, in most cases this aspect does not apply to Desktop PCs or Laptops too. These are designed to attain much higher performance, hence the reason why running Android 4.2 OS on them (emulated) is not going to be a problem. Pages load smooth, videos playback with no lag and games work excellently at the highest settings thanks to Droid4X.
- The same Android Interface
Android interface in Droid4X is not modified at all, it is exactly the same as you would get on a generic Android 4.2 smartphone or tablet. There are no ads to disturb the experience and no extra content asides from the basics. Apps and games can be easily downloaded from Google Play store or via the included Browser.
Conclusion
Droid4X provides a unique experience for Android developers and users alike.

Saturday 28 March 2015

Earn mobile recharge by playing on Uminto

Hi friends. I regularly share some free recharge tricks and offers on my blog and I hope you all have enjoyed the posts. Today I'm gonna tell you about another website which offers free mobile recharges for playing games, checking mails, playing games, sending free SMS and the best part is, referring your friends. For each activity to make on this site you get reward points which can be redeemed as free talktime. For each valid referral, you get Rs.5 and the minimum payout amount is Rs.10 only. Means you can sign up and refer your two friends to get Rs.10 free recharge. The more friends you refer, the more talktime you earn.

 So, here we go...

1. Click This Link and sign up for a free Uminto account.
2. After sign up, uminto will send a verification code in your mail id, just enter that code in the uminto verification code box and verify your account. Now login to your account and complete your profile.
3. Now start doing any task from the site you like, you will get rewarded with reward points.
4. To invite your friends, click Invite My Friends tab from your dashboard and copy your referral link and send to your friends or use the social media sharing widgets.
5. When any friend joins through your referral link, you will get an SMS on your mobile regarding your rewards.
6. Now, you can validate your referrals to get your reward points. To validate your referrals, click "Invited Friends List". You will see the list of people who have joined through your referral link. There, you will see a green button "Validate to get Rs.5", just click on that green button and your referral will be validated and the amount will be added into your account. After validation, the validation buttons will be disappeared and you will see "Amount Credited"

7. Your mobile will be recharged instantly and you will see the recharge successful message.
>>>JOIN UMINTO NOW<<<

NOTE: VERIFICATION OF EMAIL ID IS COMPULSORY OTHERWISE YOUR PROFILE WILL NOTBE ELIGIBLE FOR FREE RECHARGES. 

Rs.50 Cashback on Rs.100 Recharge on Paytm

aytm offering Mobile Recharge & Bill Payment Rs. 50 Cashback on Rs. 100. Offer applicable for all users on all platform.


About Offer:-
  •  Rs 50 cash back on recharge/bill payment of Rs 100 or more.
  • Applicable for all platforms
  • Applicable for all users
  • Maximum cash back is Rs 50
  • Usage per code: 1
  • Minimum order value is Rs 100
  • Valid only on Sunday, 29th March
  • Applicable on all recharges, bill payments and DTH


About PayTm cashback:-
  • PayTm cashback can be used to pay all PayTm services such as Recharge (Mobile Recharge, DTH Recharge & Data Card recharge), Bill Payment (PostPaid mobiles, LandLine, Electricity & Gas), Bus Ticket booking and shopping products over 500+ categories.
 How to get:-
  1. Visit paytm
  2. Recharge or Bill payment with  Rs. 100+
  3. Login or register
  4. Use  coupon  WC50 to get Rs. 50 cashback on Rs. 100+ recharge
  5. Pay the amount
  6. Cashback will be credited within 1 hour

Thursday 26 March 2015

AMIDuOS Offers Android Emulator On Windows


AMIDuOS is an application that runs under Windows 7+ that appears to be designed more with the tablet user who wants a stock Android experience in mind. My latest playing with Bluestacks, who appears to be the current leader in the market, it seems to be less of an Android experience and more of an app player, which there’s nothing wrong with. Both will play apps, but DuOS has a stock launcher and will let you play behind the scenes pretty easily.
AMIDuOS is launched and takes over a screen the computer or tablet (you can still get back to Windows), whereas Bluestacks functions more like an Android app in a window.

AMIDuOS Folder SharingAMIDuOS boasts they’ve used their years of experience designing PCs to make their Android emulator have direct access to the resources it needs to run perfectly. On tablets, which I am not currently packing a Windows one, AMIDuOS supports multi-touch and gestures like Pinch-to-Zoom sensors including cameras, audio/microphone, Accelerometer, Gyrometer, compass, orientation, and a full-featured software keyboard although if you’re running it on desktop, you can use your keyboard for text entry.
Android applications can be pinned back to the Windows Start menu so you can directly jump into that app from Windows as opposed to launching AMIDuOS and then launching the app. Files can be shared back and forth, although not via drag and drop – you have to define some shared directories. Not a deal breaker but it does feel clunky.
AMIDuOS Root modeAMIDuOS allows you to set the system to run in root mode. Setting it to root mode doesn’t grant you superuser access, you’ll still need to install an application like SuperSU installed to manage requests for Superuser access. Setting this mode also will require you to shut down and restart the Android emulator, but that’s not a particularly menacing endeavor.
Screen positioning fails
AMIDuOS wants monitor 1 and chooses dead center of the virtual vertical space. If you’ve got monitors side by side this is not much of an issue. If you’ve got a monitor at a 90-degree angle as you use the one on the right to read and edit in portrait mode, you’ve got AMIDuOS taking the top half of your primary monitor with no way to move it.
Moving AMIDuOS from monitor one to monitor two works fine until you minimize and restore it. It’ll be back on monitor one.
This being designed for tablets and not for desktops of people who deal with multiple monitors at crazy angles, I don’t particularly assign this too much buggy potential.

System Requirements

Here are the system requirements:

  • Windows 7/8/8.1

  • Intel x86 CPU

  • Hardware Virtualization Technology supported and enabled in BIOS

  • OpenGL 3.0 and above

  • Minimum 2GB of RAM, though 3GB recommended for optimal performance

  • Minimum 2GB of hard disk free space


Odd performance
Some things function perfectly, some things run faster than I’ve seen any Android device out there run, and some things will bog down the system for no reason with ~20% CPU usage and 80% kernel times. I’m not particularly used to seeing kernel times pop up on a system with an SSD drive that moves data at well over 200 megabytes per second. Your computer will most likely vary.
I’d say that it’s in beta and you should expect these sorts of things except that it does not appear to be in beta, they are selling this for $10 for a lifetime license, although you have 30 days to play with it to see if it works for you.

Google Play install separately

While this isn’t a big deal, Google Play, the place where you download your apps, needs to be installed separately. While Android is open source, Google Play and several of the services tied to it, are not, and AMIDuOS evidently doesn’t want to run the risk of distributing the Play Store without Google approval.
To get this working there’s a link on their download page, you download a GApps package in your browser on Windows, open the folder it’s in, right click and choose to Apply to DuOS. A reboot of the Android window later, and you’re in business with Google services.
It’s something to note if you’re not familiar with Android and just wanting to try it out, or if you’re not familiar with how the OS and Google Play are tied together. I’ll point out that at least some other emulators appear to come with it installed.

Wrap up

Overall, I'm pleased with the performance of AMIDuOS. It has a few small issues, but it runs fast, and if a user wanted to run Android applications with much higher performance, or needed to test an Android application in development, this would be an excellent option.The application is already available online for a free 30-Day trial, or you can purchase it for $9.99 USD.

Sunday 22 March 2015

Get Rs 20 PayTm Voucher Install Chrome Extension

 i will show you how you can get Rs 20 PayTm Voucher for just installing a Chrome Extension in your PC/laptop.


How to Get Rs 20 PayTm voucher for Free

  • Go to this Link-http://www.mysmartprice.com/promotions/plugin/
  • Click on Add to Chrome button.
  • You will get a Popup Click on "Add" button.
  • Now you will get a popup saying "Enter your email"
  • Now enter you email.
  • That's it you will get your Voucher in 3 Days.

Terms and Conditions

  • The offer cannot be clubbed with any other offers.
  • Valid only for the first time installs.
  • The offer is valid only for a limited time.
  • The Paytm voucher can be redeemed at Paytm site or app.

Wednesday 18 March 2015

Disabling the Windows Update service in windows 10

we have option to turn off Automatic Updates altogether. All we need to do is stop the Windows Update service and make sure that it won’t start again. I recommend to first check if updates are currently downloaded; if so, wait until all updates are installed. Then, type “services” in the Windows 10 search box and click View Local Services.
Windows Update service


Scroll down to Windows Update and double-click the service. Set the startup type to Disabled. If the service is already running, click Stop. After the service has stopped, click OK.
Disable Windows Update service
If you now click Check for Updates in the Windows Update app, you should see a reassuring error message:
Error message -There were some problems installing updates

Yup, that is all we wanted: “some problems installing updates.”
If you want to later enable Automatic Updates again, you have to first set the startup type of the Windows Update service to Manual and then start the service.

Tuesday 17 March 2015

Collection of Best Freeware to Create Bootable USB Drive

Many times we need to install fresh Windows or a Linux distro in a computer system but we don't have access to a working CD/DVD drive. Sometimes the computer system doesn't have any CD/DVD drive attached or sometimes the drive might be faulty or can't read your setup disc.

You can create a bootable USB drive to install Windows or Linux in your computer system. It'll allow you to boot your system using it and then it'll run the OS setup just like you do with a CD or DVD.
There are also many other benefits in installing Windows or Linux using a bootable USB drive. It makes the OS installation faster as it takes less time in copying the files from USB to hard disk compared to a CD/DVD. Also there is no need to worry about scratches or "can't copy files" error messages in case of a USB drive which we always do while installing the OS using a CD or DVD.
But creating a bootable USB drive is not very easy task. You need to run a few commands and need to follow a few steps to make it working. That's why we have shared lots of free software in past to create bootable USB drives to install Windows XP, Vista, Windows 7, Windows 8, Windows Server 2003, Server 2008 and many Linux distro like Ubuntu, Fedora, Linux Mint, Mandriva, etc.
For your convenience, we are putting all these free tools together in this single place so that you don't need to waste your time in searching for them.
So without wasting time lets share all freeware which help you in creating bootable USB drives to install Windows and Linux:
A Bootable USB:
"A Bootable USB" is an AskVG exclusive free tool which allows you to create bootable USB drive to install Windows Vista, Windows Server 2008, Windows 7 and later operating systems.
A_Bootable_USB
Windows 7 USB/DVD Download Tool:
"Windows 7 USB/DVD Download Tool" is an official freeware from Microsoft which allows you to create a bootable USB drive to install Windows 7 and later. It also allows you to create bootable DVD.for this you need microsoft .net framework 2.0 or higher
Windows_7_USB_DVD_Download_Tool.png
Rufus:
"Rufus" is a small and portable tool which allows you to format and create bootable USB drives for Windows and Linux OS. The most impressive thing about this tool is its interface. It looks very close to default format window which is shown by Windows whenever you try to format a hard disk partition or a USB drive.
Rufus_Bootable_USB_Creator.png
Setup from USB:
"Setup from USB" is a free tool to convert your USB flash drive into Windows Vista or Windows 7 bootable setup disk. You can make your USB drive as bootable and setup Windows Vista or Windows 7 on any computer that supports booting from USB.
Setup_from_USB.png
WinToFlash:
"WinToFlash" is a free software to create bootable USB drives for Windows XP, Server 2003, Vista, Server 2008 and 7 setup. WinToFlash can also transfer your live CD or DVD to USB card.
WinToFlash.png
XBoot:
"XBoot" is a free utility for creating Multiboot USB drives or ISO image files. XBoot can combine ISO files in to one Multiboot ISO file or create Multiboot USB in just few clicks.
Win32 Disk Imager:
"Win32 Disk Imager" is a free utility available for Windows which can be used for writing and restoring images to/from removable drives (USB drives, SD Memory cards, etc). It can be used to write bootable images to a usb drive, making it bootable.
That's all for now guys. If you know about any other good and free tool to create bootable USB drive for Windows or Linux, please feel free to share it in your comment. Also let us know your valuable feedback about the above mentioned freeware...

More Post